Advanced migrate rpool to new disk(s)
This guide is showing how to migrate the rpool where using the migrate rpool to new disk(s) does not suffice. Cases for this guide could be:
- You want to change the rpool from mirror to raidz(n).
- You need to rebalance the rpool.
- You need to move the rpool to disks with smaller capacity. Be advised to use disks with capacity of at least the current content of rpool + 10% for margin. Preferably the new disks should have a capacity so that the current content of the rpool will be filling up less than 80%.
- You need to change the ashift setting on the rpool.
The usecase for this guide is the need to move the rpool to disks with lessor capacity than the current disks.
NB. It is always a good idea to perform a scrub before doing operations on the pool which is potentially dangerous!.
Configuration used in this guide
This is the current rpool:
$ zpool status
  pool: rpool
 state: ONLINE
  scan: none requested
config:

        NAME        STATE     READ WRITE CKSUM
        rpool       ONLINE       0     0     0
          mirror-0  ONLINE       0     0     0
            c1t1d0  ONLINE       0     0     0
            c1t2d0  ONLINE       0     0     0

$ zpool list rpool
NAME    SIZE  ALLOC   FREE  CKPOINT  EXPANDSZ   FRAG    CAP  DEDUP  HEALTH  ALTROOT
rpool  15.5G  1.61G  13.9G        -         -     0%    10%  1.00x  ONLINE  -
Disks available in the system:
AVAILABLE DISK SELECTIONS:
       0. c1t1d0 <VBOX-HARDDISK-1.0-16.00GB>
          /pci@0,0/pci8086,2829@1f,2/disk@1,0
       1. c1t2d0 <VBOX-HARDDISK-1.0-16.00GB>
          /pci@0,0/pci8086,2829@1f,2/disk@2,0
       2. c1t3d0 <VBOX-HARDDISK-1.0 cyl 1303 alt 2 hd 255 sec 63>
          /pci@0,0/pci8086,2829@1f,2/disk@3,0
       3. c1t4d0 <VBOX-HARDDISK-1.0 cyl 1303 alt 2 hd 255 sec 63>
          /pci@0,0/pci8086,2829@1f,2/disk@4,0
The task is to migrate the rpool from the mirror consisting of c1t1d0 and c1t2d0 to a new mirror consisting of c1t3d0 and c1t4d0 where the capacity of both disks in the new mirror is lessor than the disks in the current rpool.
So after completing this guide your rpool should look like this:
$ zpool status
  pool: rpool
 state: ONLINE
  scan: none requested
config:

        NAME        STATE     READ WRITE CKSUM
        rpool       ONLINE       0     0     0
          mirror-0  ONLINE       0     0     0
            c1t3d0  ONLINE       0     0     0
            c1t4d0  ONLINE       0     0     0

$ zpool list rpool
NAME    SIZE  ALLOC   FREE  CKPOINT  EXPANDSZ   FRAG    CAP  DEDUP  HEALTH  ALTROOT
rpool  9.50G  1.60G  7.90G        -         -     3%    16%  1.00x  ONLINE  -
Before you are able to go further you need to fetch an installation iso for the version of OmniOS you have installed on the rpool. Get your iso here. In this guide, the installer iso for r151030ap is used.
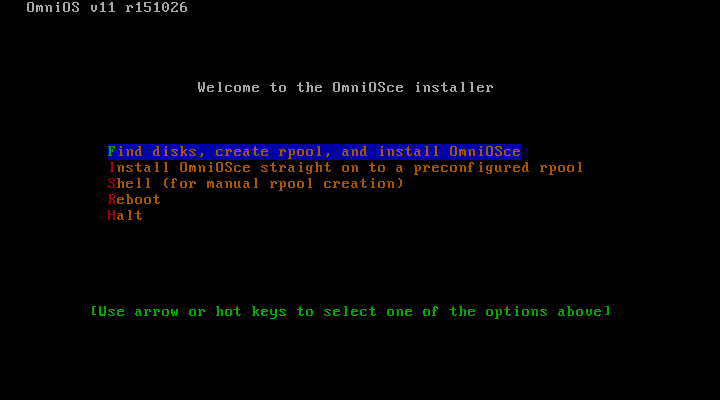
Now boot your system using the downloaded iso and when you see the installer welcome screen choose the shell option:

Now import the rpool and create snapshots for replication.
kayak-r151030ap# zpool import rpool
kayak-r151030ap# zfs snapshot -r rpool@replication
Now we need to find the name of the current Boot Environment(BE) since we need this name later.
kayak-r151030ap# beadm list
BE               Active Mountpoint Space Policy Created
omnios-r151030ap R      -          609M  static 2020-04-27 21:47
The current BE is called omnios-r151030ap
Since device name might have changed you need to run format to display the new device names.
kayak-r151030ap# format
Searching for disks...done


AVAILABLE DISK SELECTIONS:
       0. c3t1d0 <VBOX-HARDDISK-1.0-16.00GB>
          /pci@0,0/pci8086,2829@1f,2/disk@1,0
       1. c3t2d0 <VBOX-HARDDISK-1.0-16.00GB>
          /pci@0,0/pci8086,2829@1f,2/disk@2,0
       2. c3t3d0 <VBOX-HARDDISK-1.0 cyl 1303 alt 2 hd 255 sec 63>
          /pci@0,0/pci8086,2829@1f,2/disk@3,0
       3. c3t4d0 <VBOX-HARDDISK-1.0 cyl 1303 alt 2 hd 255 sec 63>
          /pci@0,0/pci8086,2829@1f,2/disk@4,0
Now create the new pool newPool for migration and run zfs send/recv to migrate rpool to newPool. The -B switch tells
the zpool command to reserve space for an UEFI boot partition. This is essential to get your disk to boot if your
system is a using UEFI boot. If you have a legacy system, it won’t hurt.
kayak-r151030ap# zpool create -B newPool mirror c1t3d0 c1t4d0
kayak-r151030ap# zfs send -R rpool@replication | zfs recv -Fdu newPool
After we have migrated the rpool to newPool we can now remove the snapshots made for replication and export the rpool.
kayak-r151030ap# zfs destroy -r rpool@replication
kayak-r151030ap# zfs destroy -r newPool@replication
kayak-r151030ap# zpool export rpool
If you list the BE’s now you will see the BE’s from newPool which is identical to the BE’s on rpool except that no BE is active
$ beadm list
BE               Active Mountpoint Space Policy Created
omnios-r151030ap -      -          609M  static 2020-04-27 22:47
So to make the BE on newPool active do this:
kayak-r151030ap# beadm activate omnios-r151030ap
Activated successfully
Now we are ready to rename newPool to rpool. This is done this way:
zpool export newPool
zpool import newPool rpool
zpool export rpool
You can now reboot the system. Remember to either disconnect the disk holding the old rpool or make sure to instruct the BIOS to boot from the new disks.
Contact
Any problems or questions, please get in touch.